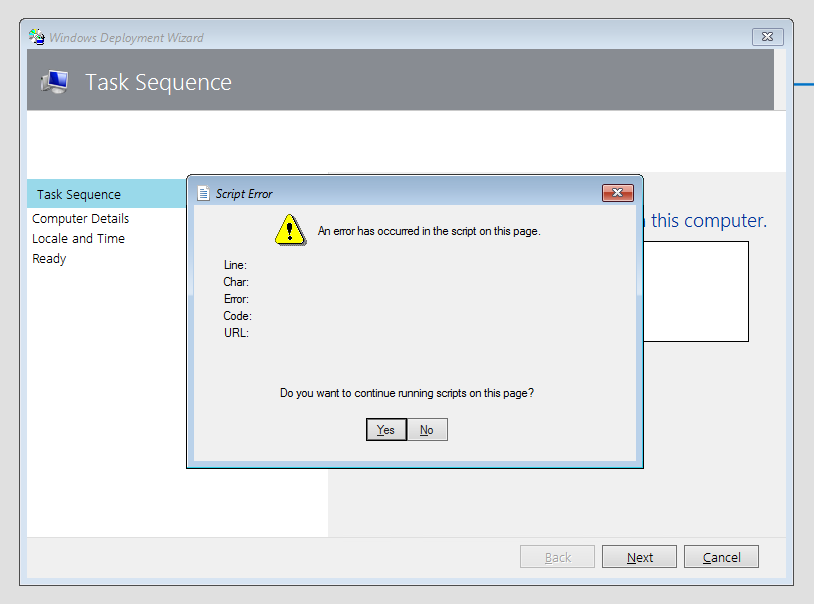
1. Open Powershell 5.1 or later 2. Determine a save location. In my example an SMB storage location will be used 3. If you are not sure of the name of the powershell module you are looking to save offline utilize the Find-Module *name* command. Under the name column will be the PSGallery name 4. Run the command Save-Module -Path “File location” -Name vmware.powercli. In the picture below you can see both step 3 & 4 shown as well as the progress when saving the module(s).
If you have a device either in your possession or in the hands of a employee but you can’t seem to connect to intune. I found and tested this step to resolve an issue with a machine not connecting to our intune tenant no matter what I tried before.
As screen in the picture you need to browse to the registry location and remove all the GUID folders. Once removed try to sign-in through the intune/company portal app again and you should be successful
Trying to give myself things to learn with Powershell. I thought, “what’s a good way of forcing myself to disconnect from Teams/Slack as that shows me as available to the company I work for”. We’ll I came up with a little script that finds the time and then starts/stop services based -gt (greater than) times.
##################################################################
# Scripts purpose is to stop you from working after 5:00 PM & #
# start service when you need to work #
##################################################################
#Get time
$OOP = Get-Date
#Strategy
if ($OOP -gt '5:00 PM') {
Get-Process Teams, slack | Stop-Process -Force
}
elseif ($OOP -gt '8:00 AM') {
Get-Process Teams, slack | Start-Process -Force
}
A sample of the script is above ^. If you would like to automate this daily you would just have to simply open Task Scheduler and set up the script to run weekly with the preferred week days. Remember to set the application to powershell.exe -File “Path to script” in the variables of the task schedule. Two will be needed if you want to start and stop the day.
In the possibility that you do not have WSL enabled by default. I’ve listed a command below that can be run through an elevated PowerShell to enable that environment/program.
wsl –install (If you see WSL help text try and run wsl –list –online)
Enabling WSL Version 2
Restart your computer, sign back into your machine, and open another elevated Powershell prompt. Once open again run the command below.
wsl --set-default-version 2
WSL 2 requires an update to its kernel component. For information please visit https://aka.ms/wsl2kernel.
If you are are promted with the above message. Open this link -> WSL Kernel. Download and install the WSL kernel. Once the kernel is downloaded and installed run wsl --set-default-version 2 again.
Installing your favorite Distro
With Powershell 7 still open in admin mode run the command to change your distro
Run wsl –list –online before the below command so you can decide which distro you want to run virtually on your system.
wsl –install -d <Distribution Name> (Replace with the name of the distribution you would like to install.)
Lately, in technology news, Microsoft has made changes to the Office 365 Navigation Bar in Outlook making some users frustrated. Thankfully, with this post I have a set of steps below to identify the issue and fix it.
Image was captured from Microsoft’s Technet forum
Fixing The Navigation Bar
Here’s a list of steps to fix the navigation bar in Outlook for Office 365.
1. Close Microsoft Outlook 2. Open the Run box with WIN+R and enter outlook.exe /safe 3. Did not find the Outlook toggle – Coming Soon 4. Close the Outlook version running in safe mode 5. Reopen Outlook
Below is a script that I had used to find the version of Micrsoft’s Dot Net Framework software. Sometimes you may not find the install version in control panel and you do have other ways to find it through reg or the properties of a DLL file. Why not do everything through Powershell though
With the script above… You can copy and paste that into a non-administrative Powershell ISE window. As shown below you will see what the script looks like pasted, ran, and what the output should look like
After running the above script and confirming it works for your use. You can then save as and save it under your script collection to run when needed. In my particular case I run this through SCCM on demand when I need to know what the .NET version is for the CAS, DP, MP, CMG, ETC especially when more requirements come out for newer versions.
In the midst of attempting to deploy out a new Windows Server 2019 installation I came across a new issue. As mentioned in the title of this quick block. My remote virtual machine posted the error 0xc0000001 which was odd since I was able to PXE call from my onsite domain controller (DC02) and start to load the boot file config.
After some research and a few cups of coffee I found that the resolution to this issue was the Enable Variable Windows Extension. To fix this follow the instructions below… 1. Open your Windows Deployment Services app or WDS 2. Right click on your WDS server in the left pane 3. Left click on Properties 4. Click on the TFTP tab within the properties window 5. Uncheck Enable Variable Windows Extension 6. Lastly Reboot your WDS Server
If you followed all the steps above correctly you should be able to PXE boot your VM from MDT now. Enjoy!
Launch the Configuration Manager console, click Software Library, under Application Management right click Applications and click Create Application. Choose Manually specify the application information and click Next.
Building The Application Deployment
Download G’MIC software from here. Once you have downloaded the GIMP software, you can copy it to a folder on the ConfigMgr server or shared folder on a file server (if its in the same DC).
Specify some information about the application. Click Next.
For the Content Location, provide the path where the GIMP setup file is present. In my case I have copied the setup file to a folder named GIMP on SCCM server. The next step is to specify install and uninstall command. Information: Content Location: \dc19\Share\Software\Deployments\Software\GIMP\Plugins Installation Program: “gmic_2.9.6_gimp2.10_win64.exe” /LANG=English /VERYSILENT /NORESTART /SP- Uninstall Program: %AppData%\GIMP\2.10\plug-ins\gmic_gimp_qt\uninst\unins000.exe /VERYSILENT
Detection Method – Detection method allows the administrator to check if the application is already installed. It can also prevent an installation of an application if it conflicts with another application that is already installed. Click Configure rules to detect the presence of this deployment type and click on Add Clause.
On the Detection Rule window, choose Setting Type as Registry. Under HKEY_CURRENT_USER, set the following
In this blog I will be showing you how to deploy a Linux – Ubuntu 18.04 LTS ISO through Azure. Since I need to deploy one anyways for a new internal service I will be using called – Ansible Tower. I thought “why not make a blog about this first” and then make another post about my findings regarding Ansible.
Signing Into The Portal
1. Paying for Azure Usage
Probably one of the most important first steps will be deciding how you are going to be paying for Azure. If you are new to Microsoft Azure ~ click here to read up on my blog post to get free Azure credits. If you already have an Azure account but don’t have credits to use you can also find out the cost to run the virtual machine through the Azure calculator. In most cases, the lower end B-Series VM’s run at most around $20-30 a month but don’t just go on my word. Again check the calculator to see what your estimate will be so that you can properly budget the costs out. If you know that you’ll be using this virtual machine for a period of 1 or 3 years you can opt for those locked in rates to get reduced pricing too.
After clicking on the Sign in box. You’ll want to either pick your last used account or sign into another account preferably the one that’s being used with Azure. Hopefully you’ll be using the one that has free credits. If it was already setup during the account creation, you should be prompted for a 2FA whether it be through e-mail, text, or an access token.
Deploying A Linux Machine
1. Creating And Choosing The Resource
After signing in to the Azure portal. You will be prompted with a pop up window to be given a tutorial of the console. If you’ve just started with Azure I’d recommend that you take the time to run through the guide to get at least an overview of what you are working with. If you decided to skip that for now. Click on the (+) Create a resource button.
After the above step is completed. In this new menu or catalogue you can choose to run over 300 services of your choice. That’s a lot! However, for this case we will be deploying the common Ubuntu Server 18.04 LTS image.
2. The Basics
Couple things we’ll be doing in this section * Choosing the subscription that you want to use: This should only be one * Choose the resource group: You should be creating a new one. For me, I selected a pre-existing one that I have been using. * Give the virtual machine a name: remember to stay within the requirements (this can be found by clicking or hovering over the (i). * Choose the virtual machine region: This is pretty important for a few reasons. Choosing in a region that you are located reduces latency to the machine and can save on costs as some reasons are more expensive than another. * Choose the size of the machine: You don’t have to go with the few options that Microsoft provides when spinning up a virtual machine. You do have options to “see all” or more compute options. Generally speaking the B-series for development/testing or homelab environments are good.
Continue from the last portion * Choose the authentication type: SSH public key’s would be the most secure but you do need to go through extra steps to get that into a readable file for putty – This key is essentially your password. If you don’t want to you can always make a standard password but I would suggest either SSH over a VPN tunnel or isolate SSH to your external IP address. * Username: Setup a good username. Microsoft does cross check username’s with commonly used one’s so you don’t become compromised. * Key source and name: Generate a new key pair and either use the generic name or create your own unique standard name * Port rules: Depending on the existing setup or purpose of the virtual machine you can do a couple of things. For me, I will not be enabling inbound ports since this virtual machine will be traversing my IPSec tunnel. The image below depicts the typical setup.
3. Sizing The Disk(s)
Choosing your disk can very depending on your use case. For the amount of cost and use case I typically change the Disk from the standard Premium disk to Standard SSD which is basically fast enough for any of my needs. I also change the disk storage from 1TB to 64GB’s.
4. Networking The Virtual Machine
Create a virtual network: If you filled in the above sections you should be able to create a new virtual network under your subscription. You also have the ability to use an existing VNET. Subnet: Choose an existing or create a new subnet that the new virtual machine will reside under. This will be the network that is internal or private to your subscription. Public IP: Following the understanding from the previous sections the public IP can be used if you are just creating a new network and don’t have an IPSEC tunnel or you are just settings this up for testing purposes. Leave all the NIC NSG, Public inbound ports, and select inbound ports as is (under the NIC network security group you can restrict access to the WAN IP of your home or business internet connection).
5. Management
For the tenant I have I’ve let these settings as default but they can be changed depending on your circumstances. Enabling Azure Active Directory or AAD would be most beneficial if you have a directory or local directory sync. Enabling auto shutdown will save on your consumption costs too if you are trying to be cost conscious. Another important item to check would probably be the backup function. This can come in handy if you need to instant restore a VM for the last 2 days or restore files for the last 30 days or however long your retention is.
6. Advanced
For this article, I have skipped over all of the Advanced options but feel free to look at them and what those options do.
7. Tagging
8. Reviewing The Deployment
You made it! Congrats. Now all you have to do is just double check that all is correct with your deployment and create the VM.