How-To Build an Azure Linux VM

In this blog I will be showing you how to deploy a Linux – Ubuntu 18.04 LTS ISO through Azure. Since I need to deploy one anyways for a new internal service I will be using called – Ansible Tower. I thought “why not make a blog about this first” and then make another post about my findings regarding Ansible.

Signing Into The Portal

1. Paying for Azure Usage

Probably one of the most important first steps will be deciding how you are going to be paying for Azure. If you are new to Microsoft Azure ~ click here to read up on my blog post to get free Azure credits. If you already have an Azure account but don’t have credits to use you can also find out the cost to run the virtual machine through the Azure calculator. In most cases, the lower end B-Series VM’s run at most around $20-30 a month but don’t just go on my word. Again check the calculator to see what your estimate will be so that you can properly budget the costs out. If you know that you’ll be using this virtual machine for a period of 1 or 3 years you can opt for those locked in rates to get reduced pricing too.

2. Logging Into The Azure Portal

First, you will want to go to https://portal.azure.com or through https://azure.microsoft.com/en-us/ to access the portal.

Signing into the Azure Portal

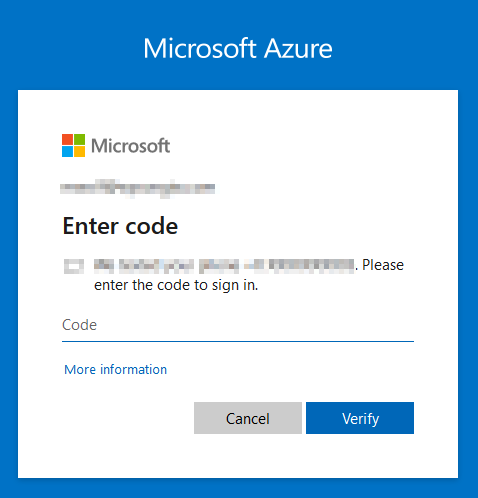
After clicking on the Sign in box. You’ll want to either pick your last used account or sign into another account preferably the one that’s being used with Azure. Hopefully you’ll be using the one that has free credits. If it was already setup during the account creation, you should be prompted for a 2FA whether it be through e-mail, text, or an access token.
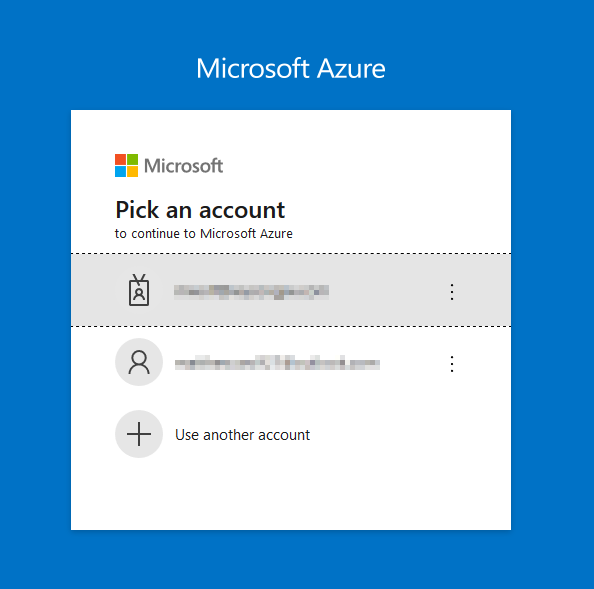
Choosing the account to sign into Azure
Entering MFA code for Azure

Deploying A Linux Machine

1. Creating And Choosing The Resource

After signing in to the Azure portal. You will be prompted with a pop up window to be given a tutorial of the console. If you’ve just started with Azure I’d recommend that you take the time to run through the guide to get at least an overview of what you are working with. If you decided to skip that for now. Click on the (+) Create a resource button.
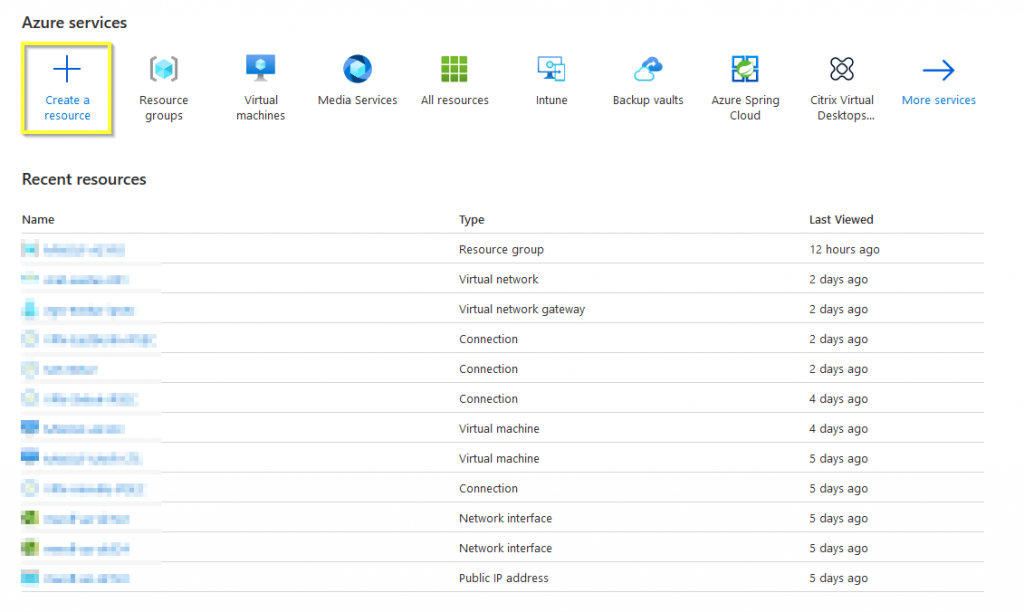
Creating a resource for the linux machine in Azure

After the above step is completed. In this new menu or catalogue you can choose to run over 300 services of your choice. That’s a lot! However, for this case we will be deploying the common Ubuntu Server 18.04 LTS image.
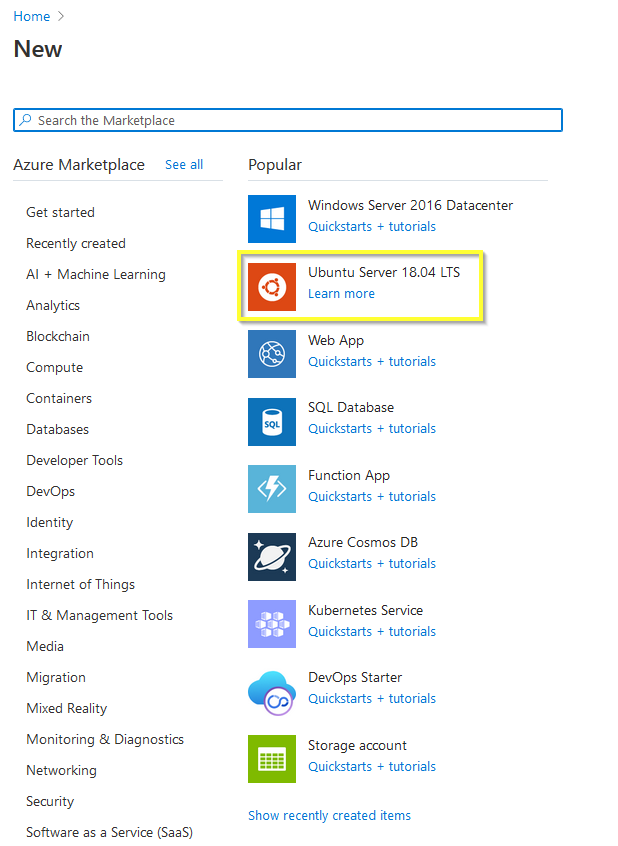
Selecting from the Azure Marketplace

2. The Basics

Couple things we’ll be doing in this section
* Choosing the subscription that you want to use: This should only be one
* Choose the resource group: You should be creating a new one. For me, I selected a pre-existing one that I have been using.
* Give the virtual machine a name: remember to stay within the requirements (this can be found by clicking or hovering over the (i).
* Choose the virtual machine region: This is pretty important for a few reasons. Choosing in a region that you are located reduces latency to the machine and can save on costs as some reasons are more expensive than another.
* Choose the size of the machine: You don’t have to go with the few options that Microsoft provides when spinning up a virtual machine. You do have options to “see all” or more compute options. Generally speaking the B-series for development/testing or homelab environments are good.
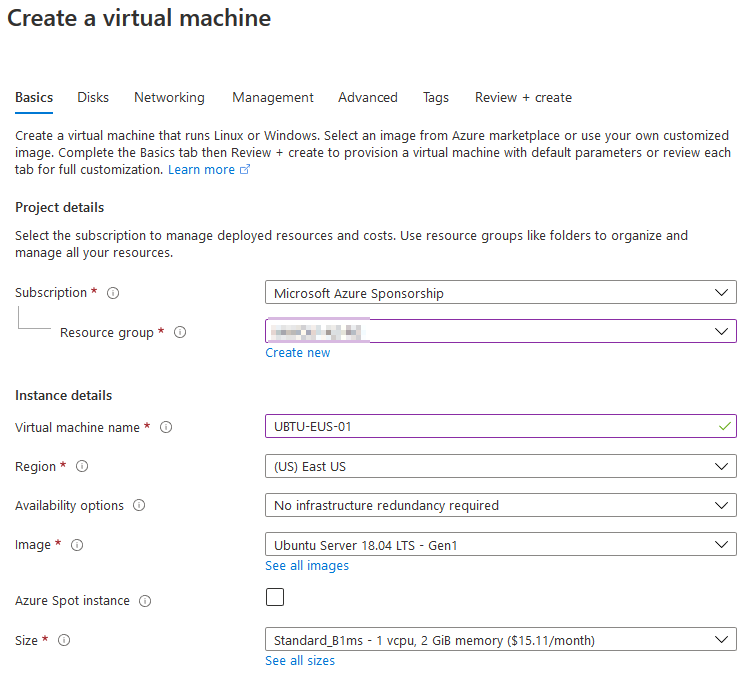
Creating a virtual machine using the marketplace selection

Continue from the last portion
* Choose the authentication type: SSH public key’s would be the most secure but you do need to go through extra steps to get that into a readable file for putty – This key is essentially your password. If you don’t want to you can always make a standard password but I would suggest either SSH over a VPN tunnel or isolate SSH to your external IP address.
* Username: Setup a good username. Microsoft does cross check username’s with commonly used one’s so you don’t become compromised.
* Key source and name: Generate a new key pair and either use the generic name or create your own unique standard name
* Port rules: Depending on the existing setup or purpose of the virtual machine you can do a couple of things. For me, I will not be enabling inbound ports since this virtual machine will be traversing my IPSec tunnel. The image below depicts the typical setup.
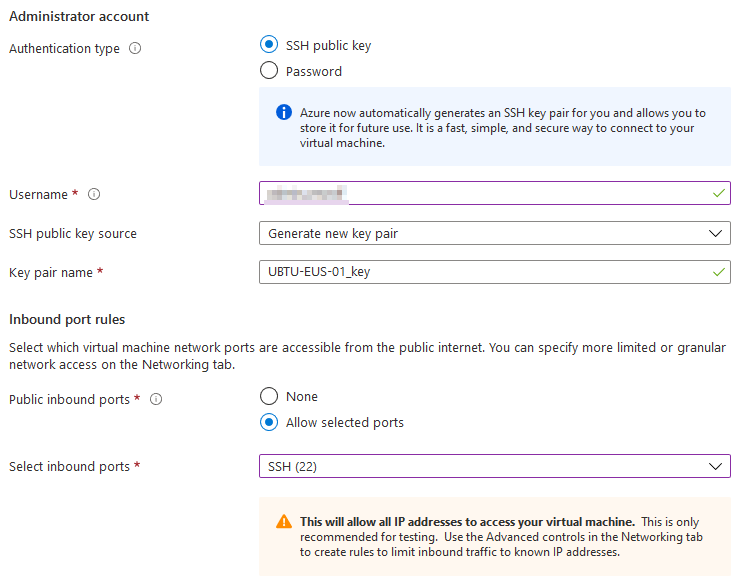
Generating a keypair for SSH access to the VM

3. Sizing The Disk(s)

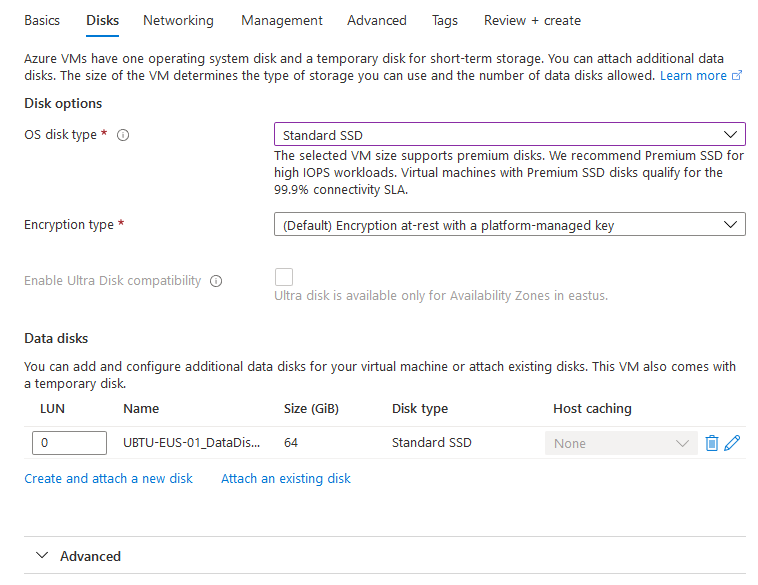
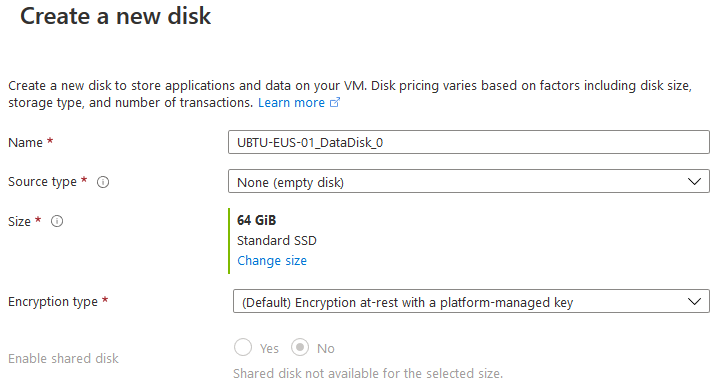
Choosing your disk can very depending on your use case. For the amount of cost and use case I typically change the Disk from the standard Premium disk to Standard SSD which is basically fast enough for any of my needs. I also change the disk storage from 1TB to 64GB’s.
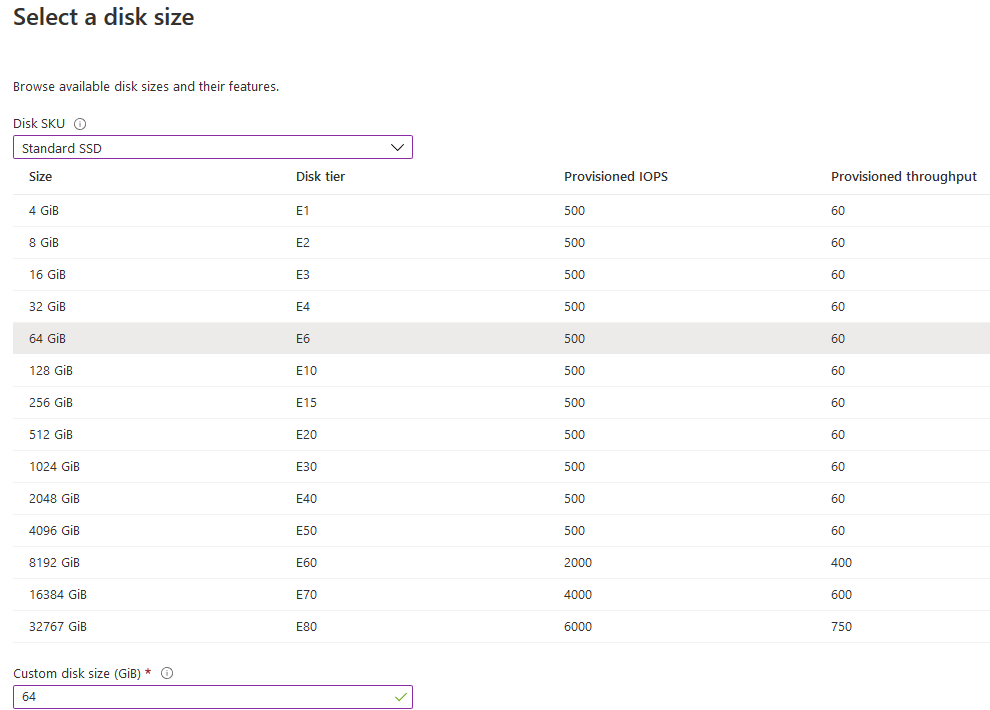
Selecting the disk size for the VM
Selecting the disk size and encryption methods in azure
Selecting the disk type

4. Networking The Virtual Machine

Create a virtual network: If you filled in the above sections you should be able to create a new virtual network under your subscription. You also have the ability to use an existing VNET.
Subnet: Choose an existing or create a new subnet that the new virtual machine will reside under. This will be the network that is internal or private to your subscription.
Public IP: Following the understanding from the previous sections the public IP can be used if you are just creating a new network and don’t have an IPSEC tunnel or you are just settings this up for testing purposes. Leave all the NIC NSG, Public inbound ports, and select inbound ports as is (under the NIC network security group you can restrict access to the WAN IP of your home or business internet connection).
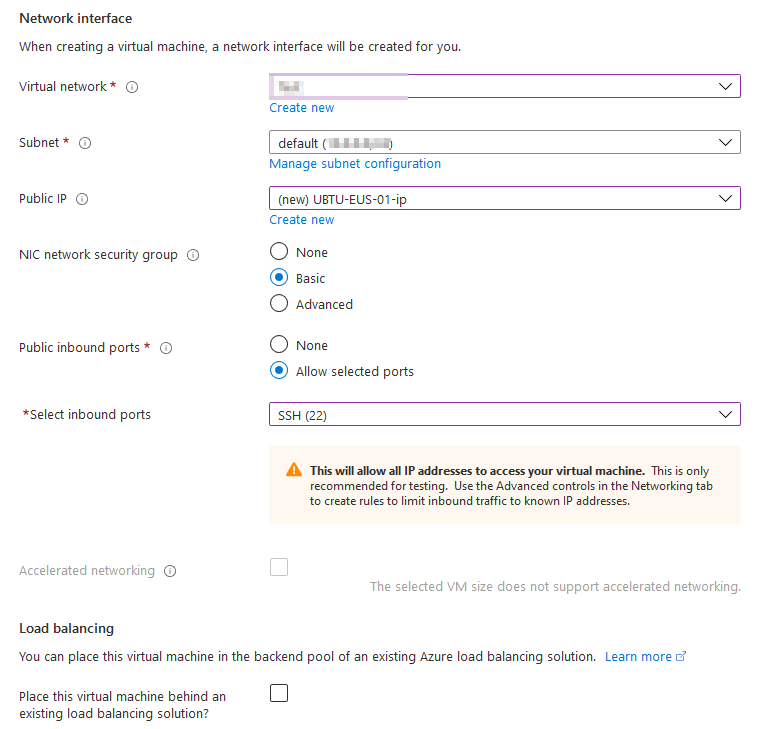
Setting up the network information for the virtual machine

5. Management

For the tenant I have I’ve let these settings as default but they can be changed depending on your circumstances. Enabling Azure Active Directory or AAD would be most beneficial if you have a directory or local directory sync. Enabling auto shutdown will save on your consumption costs too if you are trying to be cost conscious. Another important item to check would probably be the backup function. This can come in handy if you need to instant restore a VM for the last 2 days or restore files for the last 30 days or however long your retention is.
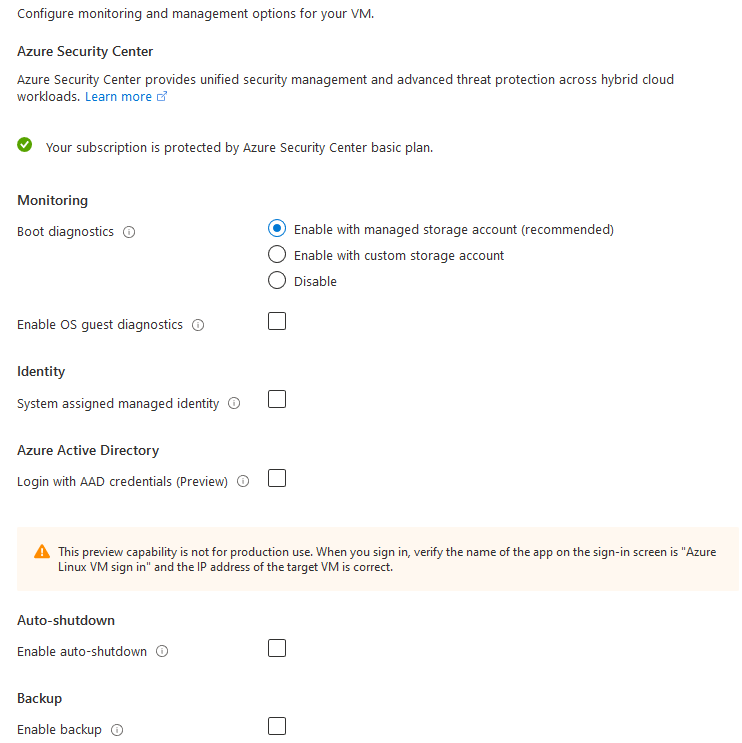
Management features such as secure login, auto shutdown, and backups

6. Advanced

For this article, I have skipped over all of the Advanced options but feel free to look at them and what those options do.

7. Tagging

Tagging the resource

8. Reviewing The Deployment

You made it! Congrats. Now all you have to do is just double check that all is correct with your deployment and create the VM.


Free Azure Credits

Getting Azure Credits For Free

Depending on your circumstances you can save money with Microsoft Azure credits if you are applicable. If applicable, those credits are applied to your account on a monthly or yearly basis and they are used until they are exhausted from your account or expired. You can think of this similar to a refillable cellphone plan that you may have had as a kid. For the majority, we’ll stick with the most sought plans.

1. Azure Free Account

The Azure Free Account, will give you access to a number of Azure services. Microsoft will give you a set of access throughout your trial and free account. You’ll have $200 dollars of credits to use within the first 30 days of activation, 12 months of limited free services, and always free services.

With this free account ~ Always remember to set limits on your account for budget spending or to review what you are deploying. Some virtual machines or other deployments can get out of hand and you could end up with a bigger than expected bill.
* It is recommended, by Microsoft, to only have a max of 1 free account per person.

2. MSDN Subscription

Personally don’t think too many people will go for this option due to the upfront costs. However, If you’re a Visual Studio subscriber, you can get monthly Azure credits to develop your knowledge on the services that Azure does offer. The credit amount does depend on the type of subscription that you do purchase.

A Visual Studio Enterprise subscription, can get you $150 in monthly credits. For subscriptions through MSDN Platforms you get $100 a month. For Visual Studio Professional and Visual Studio Test Professional, you get $50 a month.

3. Non-Profit Subscription

The non-profit subscription, I believe, is the most beneficial for anyone that does manage a non-profit or owns one. Microsoft generously gives, each year, approved organizations a donation of $3,500 dollars in Azure credits that can be used towards workloads in the Azure cloud (excluding Azure Active Directory). Microsoft is attempting to make these types of technological advances affordable and accessible for those organizations. Every

No matter the industry you’re in or learning level you’re at, there are a wide variety of credits and resources offered that can help make Azure an affordable option for you.


Build A WordPress Server On Vultr

Hope everyone reading is doing well especially with COVID-19 still going on. I’m writing up another How-To post of Deploying A One Click App. I thought it would be a great write up since I used a One Click App deployment for my own website. I’ve personally used Vultr over the years because of their broad range of scale. It certainly nice to have a company that sells shared compute for as low as $2.50 a month or high as $640. Its a lot better than my bill through Azure that cost me around $23 to $30 a month for a personal website. As of right now, my costs are around $7 for backup and compute.

To get started, I’ve provided my affiliate code here – https://www.vultr.com/?ref=8752605-6G. The code will give you $100 dollars of FREE credit to use on anything you want on Vultr’s website.

Joining Vultr

  1. Create a user account on https://vultr.com
  • Enter your e-mail address
  • Create a good strong password
  • Confirm your account when you receive the confirmation e-mail from Vultr

2. Reuse the tab that you used to create your account or open a new tab and type in https://my.vultr.com/

Deploying A Server

3. Hover over the plus (+) button on your account and click Deploy New Server

4. Choose the type of instance or server that you want. For the One Click App we’re going to choose the Cloud Compute.

5. Next we’ll want to choose the location closest to you or your target area. Usually the first is chosen over the latter. For me, New York (NJ) is the closest to me.

6. Next, Choose the type of application you want to deploy. I deployed a WordPress app for this article.

7. Choose the size of your server. This section really depends on what you are deploying. For a low traffic WordPress site I’m using the $10/month plan.

Customizing The Virtual Machine

8. Add any additional features that you may want for your compute. I enabled IPv6, Backups (this should be enabled just in case you have an issue with your app you can always roll back), I enabled private networking for later use.
9. You will have to open some ports if you are using WordPress or another site Apache/Tomcat/NGINX

  • Accept | ICMP | 0.0.0.0/0
  • Accept | SSH | 0.0.0.0/0 (for the best security I would recommend an SSH Key session or securing the SSH to your home IP address)
  • Accept | TCP (http) | 0.0.0.0/0
  • Accept | TCP (https) | 0.0.0.0/0

10. Success! You’ve created a One Click App. You can click on the server to gain access to all the statistics and information to access the server’s admin panel or any other management interfaces to configure it.

Install Windows Server 2019

After the ISO loads on your physical or virtual server. Follow the instructions below to install the operating system.

Click on Install Now

Select your version that you’d like to install. Mine is a little different since its a custom ISO for Vultr.

Accept the terms and conditions for the installation.

For this lab, select the Custom: Install Windows only (Advanced)

Choose the disk that you’ve assigned to the virtual machine or select the only one that is available.

Allow Windows to install on the disk until completed.

After the installation completes you should be prompted to create a password for the local account. As usual, choose a good password.


How To Install Server 2019 On VMware

I’m going to show you how to install Server 2019 on a VMware based platform. For most readers, you’ll probably be in a situation where either you are moving on from an earlier version or installing a fresh copy. For this guide, were going to go through and install a fresh copy.

System Requirements (Estimated)

  • Processor – 1.4 GHz 64-bit processor
  • RAM – 512 MB
  • Disk Space – 32 GB
  • Network – Gigabit (10/100/1000baseT) Ethernet NIC
  • Optical Storage – DVD drive (if installing the OS from DVD media)
  • Video – Super VGA (1024 x 768) or higher-resolution (optional)
  • Input Devices – Keyboard and mouse (optional)
  • Internet – Broadband access (optional) 

Installation

We’ll want to download the evaluation ISO from the Microsoft website. You do have other options to download a VHD or setup an Azure instance, which, we’ll cover in another article.
Windows Server 2019 Evaluation Download

Once you’ve selected the ISO evaluation you should expect a 4.9GB download to start. If you are on Windows the download will be located under your Downloads folder or C:\Users\User\Downloads. After the download is complete, for my case, we’ll open up the VMware console.

Choose the ESXi host – 192.168.4.13, right click, and select create a New Virtual Machine…
See the slideshow below for details on how to setup the virtual machine before deploying the operating system.

  1. Select “Create a new virtual machine”.
  2. Create a name for the virtual machine – something that best fits your environment.
  3. If you have more than one host – select the host that you want to install the operating system on.
  4. Choose your storage. Again, this will be dependent on the environment you have in place. If you have shared storage you’ll want to select the correct datastore or direct storage.
  5. For compatibility reasons, I’ve selected ESXi 6.5 and later…
  6. Select the correct Guest OS information.
  7. Lastly, customize the hardware appropriately. You’ll want to refer to the above Systems Requirements.

Deploying Windows Server 2019

Now we are in the deployment phase of the operating system. If you haven’t logged out of VMware vCenter or ESXi start the virtual machine by click on the sideways green triangle.

Next, select either the Launch Web Console or Launch Remote Console. Preferably in this case you’ll want to use the Remote Console to add the ISO unless your PXE booting.
* If you select the Launch Remote Console option you can download this VMRC file to get started – Here

When you have the remote console open. Click on VMRC, Removable Devices, CD/DVD, and then browse to your ISO

After the ISO loads… select your settings. Mine are shown below in the image.

Click on Install Now

Select your version that you’d like to install. Mine is a little different since its a custom ISO for Vultr.

Accept the terms and conditions for the installation.

For this lab, select the Custom: Install Windows only (Advanced)

Choose the disk that you’ve assigned to the virtual machine or select the only one that is available.

Allow Windows to install on the disk until completed.

After the installation completes you should be prompted to create a password for the local account. As usual, choose a good password.

Software That’s Running My Homelab

Software And Virtual Machines

Geographically… We’ll be starting with my “Annville” location. A nice thing to note for a later upcoming blog is that the Annville and York sites are 55 miles from each other which is technically okay for a DR (Disaster Recovery) especially with it being in a mountainous area.

Annville:

Plex
This is a Ubuntu 18.04 LTS virtual machine with Plex running as a dedicated service. I’ve added some other functions to this virtual machine to help in my automation task to create less repetitive work which is keeping the service up-to-date. I’ve also setup the server to connect via fstab to the YKGE server since that serves some folders connected to my Google GSuite account. To keep things a little more secure… all the data goes through the IPSec tunnel. It keeps the tunnels up so its worth it. I don’t permit external users on my server.
BlueIris
This is a local security system for my secondary remote server cabinet. I maintain cameras internally and externally for the house. All of the cameras used are Dahua rebrands of Amcrest. I’ve linked Blue Iris if you want to learn more about BlueIris

Seedbox
I use this machine to host publicly available open-source software to hopefully put a small dent on the map for the non-profits that host them.
Veeam
I use this to backup… basically all of the virtual machines shown below. I’ll go into further detail in another blog post. I don’t backup virtual machines like VCSA, WordPress (Dev box), etc. For this application, I do use and renew every year under the NFR licensing that I am grateful for.


YKDC1
This virtual machine used to be on the 192.168.4.12 server but with how VMware shares resources I decided for best practice to move this virtual machine to the Annville location. This server hosts DC, DHCP, DNS, AD CS, IIS, and NPAS
YKGE
This only runs stablebit for GSuite and print services across my IPSec tunnels.

York

Host: 192.168.4.12 (R710)
This physical server has been turned off at the time of writing to reduce consumption of power at my home.

Host:192.168.4.13 (R720)
DMS(SeedDMS)
A light-weight server that runs on a Ubuntu OS to host all scanned documents; I have decommissioned this for now as I evaluate others
Bookstack
I use this often to make up my own KB articles, a recipe section for my family, and many other articles
Cacti
This is used as an SNMP poller for all of my networking equipment… Primarily a mix of Ubiquiti and Cisco


Mayan EDMS
Currently this is my document management system that runs through a turnkey system
OpenVPN
This is used to connect externally through a handheld device or laptop back into my environment. I only allow traffic to a certain subnet for security reasons
UNMS
This is a application provided by Ubiquiti to allow the management of its Edge product line. I do use this for my own purposes and to also manage a few external bridges that I’ve placed


WordPress
I do not host this in a DMZ or externally. The WordPress VM is used for development reasons.
VCSA
VCSA is basically in short VMware vCenter which I use to communicate across all 3 of my physical hosts
BlueIris
Like before in Annville this system is used to record around the building both internally and externally
RDS
This is a terminal server that I use when I’m out and about. No outbound ports of course


SQL
Since SQL is popular among Windows environments for ERP’s specifically… I’ve decided to run a Dev SQL environment to manage, maintain, and learn from.
WSUS
I use this to maintain Windows updates for all computers/servers while maintaining updates through scripts.
YKDC2
The YKDC2 virtual server is a replica to YKDC1. It maintains default replication times.
YKFS01
This is only a file server and serves both an S:\ (shared data) and H:\ (private data).
YKGE19
Again this is another general server that hosts a lot of common items I don’t want on critical pieces like a file server, domain controller, or anything like that. Basically, to keep the risk and confusion away.


What’s Running My Homelab

You may or may not know but “IT ” people are always curious as to what others are running inside their homelab and why… We all like to critique our skills and for most of us that happens at our homes an not at work. Whether it be hardware, networking, virtualization, or virtual machines. So, here’s what’s going on in my homelab for 2020.

The Lab

The way I interface with the lab changes all too often but usually its on my work laptop or desktop using Remote Desktop, VMRC, or

On-Premise Server Rack

  • 1x Arris Cable Modem – ISP (Comcast)
  • 1x Ubiquiti Edgerouter 12P
  • 1x Cisco 3750G 24 Port PoE Switch
  • 2x 1U PDU’s
  • 1x Dell PowerEdge R410
  • 1x Dell PowerEdge R710
  • 1x Dell PowerEdge R720
  • 1x APC 1500 Watt UPS

Remote Server Rack

  • 1x ONT – ISP (Verizon)
  • 1x Ubiquiti Edgerouter 4
  • 1x Ubiquiti Unifi 16 Port PoE Switch
  • 1x Cisco 3750 24 Port PoE Switch
  • 1x 24 Port Patch Panel Cat 5E
  • 1x Dell PowerEdge R710
  • 1x APC 1500 Watt UPS